Deploying Node-Todo App through Jenkins
A step-by-step guide to build declarative CICD pipeline

In today’s blog, we will walk through the process of building a Declarative CI/CD Pipeline for a Note-Todo App. The source code for this app will be managed and saved in a Git repository, and the pipeline will be defined using a Jenkinsfile. This approach will automate the process of deploying new changes every time a commit is made to the Git repository. before moving further, it is important to understand the difference between Scripted and declarative pipeline.
Understanding difference between Scripted and Declarative pipeline
Scripted Pipeline
It is the first version of the "pipeline-as-code" principle introduced in Jenkins. It was designed using a Groovy-based Domain Specific Language (DSL), which gives developers a significant amount of power and flexibility in defining complex pipeline workflows. This pipeline can dynamically handle a variety of tasks with full control over the execution flow. However, the flexibility comes at the cost of simplicity, as it requires a certain level of familiarity with Groovy scripting to write and manage the pipeline code effectively.
Declarative Pipeline
It is a more modern and structured approach to writing Jenkins pipelines. It was introduced to make pipeline code more readable, maintainable, and accessible to a wider range of users, including those who may not be familiar with Groovy scripting. Declarative pipelines are defined in a Jenkinsfile, which provides a higher-level abstraction, making the pipeline structure easier to understand. With predefined syntax and blocks, it is simpler for teams to get started and maintain the pipeline with less complexity.
Let’s now dive into the hands-on examples to see how we can implement a declarative pipeline approach and break it down step by step.
Steps to build CICD pipeline for node.js project
Following are the steps to follow:
Step-1: Creating two ec2 servers and install required packages
Launch two ec2 instances running ubuntu servers, one for Jenkins-Master node and another for Jenkins-Slave node. Keep in mind that Jenkins should have a dedicated server. So, Master node will manage Jenkins jobs and assign it to the Slave or Worker node by defining them as agent.
Install the following java commands on Master node.
 sudo apt update
 sudo apt install fontconfig openjdk-17-jre
 java -version
 openjdk version "17.0.13" 2024-10-15
 OpenJDK Runtime Environment (build 17.0.13+11-Debian-2)
 OpenJDK 64-Bit Server VM (build 17.0.13+11-Debian-2, mixed mode, sharing)
Install Jenkins on Master node.
 sudo wget -O /usr/share/keyrings/jenkins-keyring.asc \ https://pkg.jenkins.io/debian-stable/jenkins.io-2023.key
 echo "deb [signed-by=/usr/share/keyrings/jenkins-keyring.asc]" \
 https://pkg.jenkins.io/debian-stable binary/ | sudo tee \
 /etc/apt/sources.list.d/jenkins.list > /dev/null
 sudo apt-get update
 sudo apt-get install jenkins
Go to Slave node or worker node and install java dependencies on it so that Jenkins can communicate with it. Commands to install java will remain same as above (see no. 2.).
Install docker and setup ubuntu user in docker group as pipeline will run on slave node.
 sudo apt-get install docker.io
 sudo usermod -aG docker ubuntu
 newgrp docker
 sudo apt  install docker-compose
Step-2: Initializing Jenkins and connect Master node to Server Node using SSH
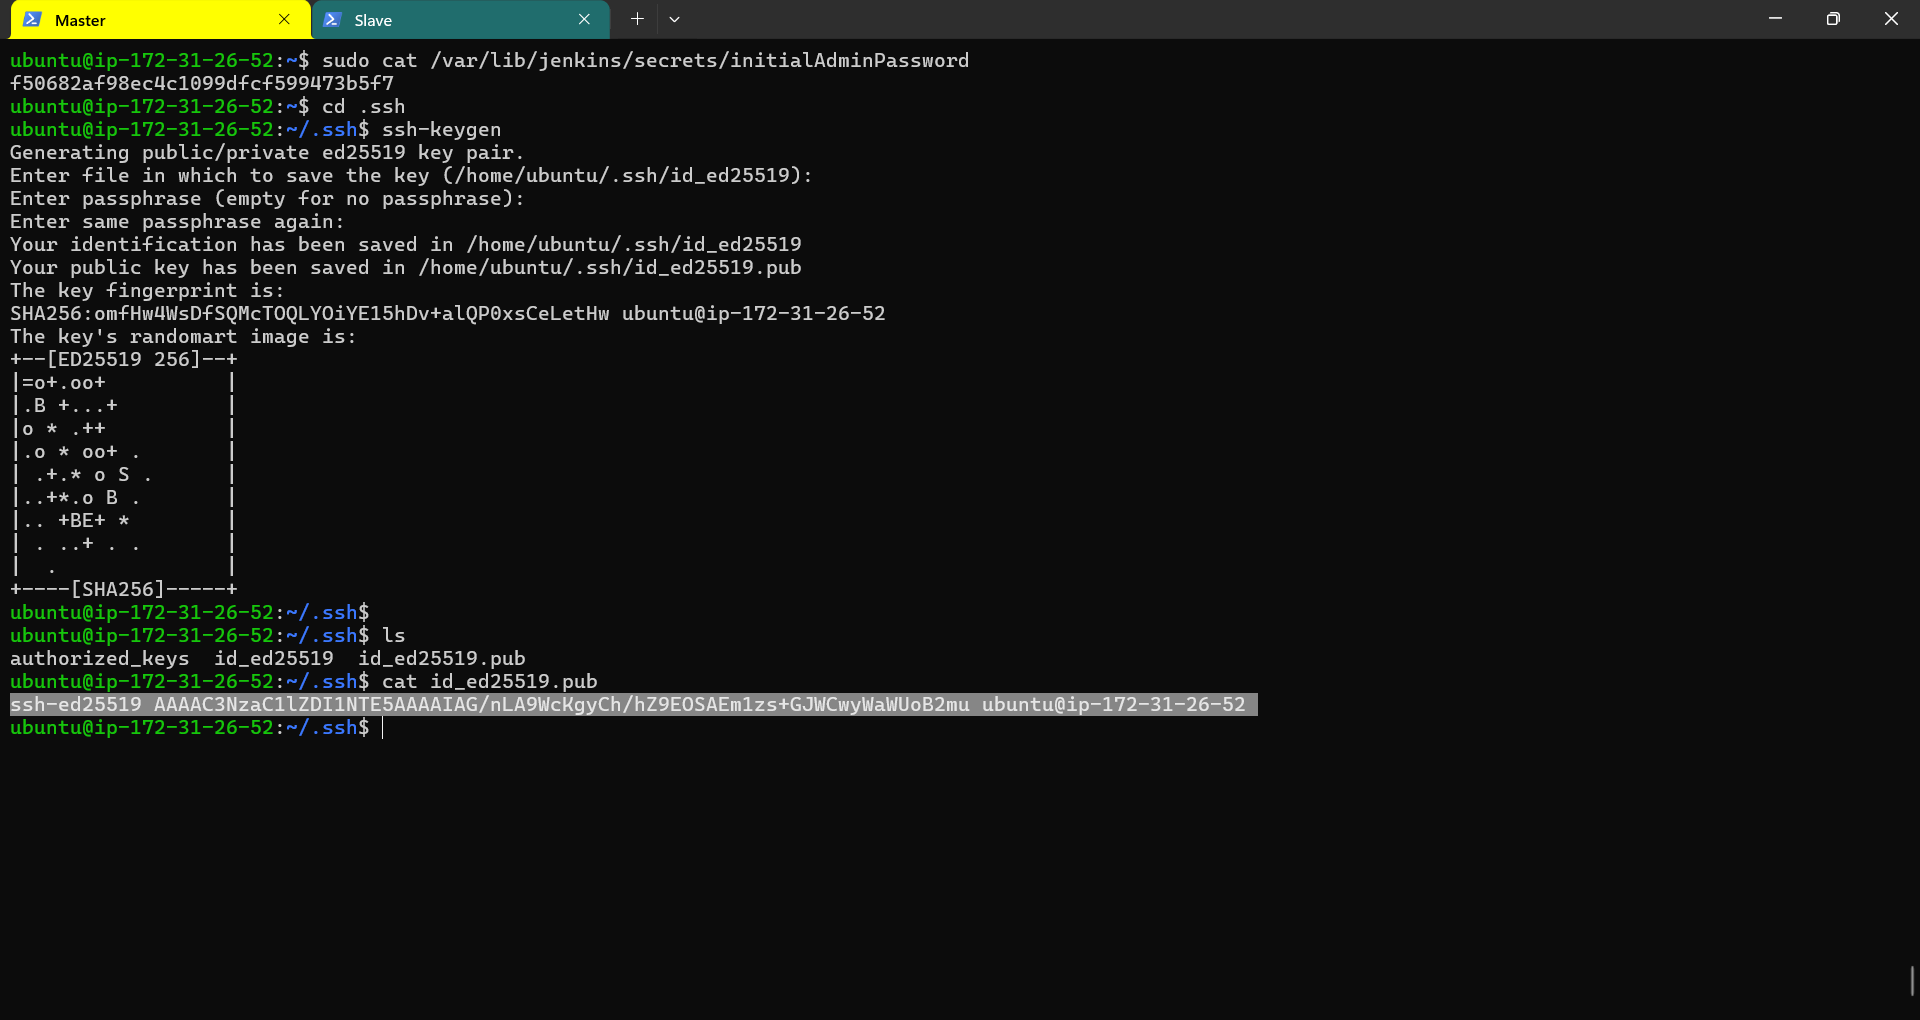
After installing Jenkins on Master node, Go to ec2 server of Master and open port 8080 to connect Jenkins in inbound security rules. Now run <Master-PublicIP>:8080 and you will see Jenkins portal there. For the first time in Jenkins, we need to set-up username and password. for that go to the path showing on screen and check for the authentication key as shown below. After that set-up username and password for the same. Install all plugins in Jenkins and you will find yourself on welcome page.
Create a directory in Slave node with the name apps. It is like WORKDIR used in docker, where whole project will reside.
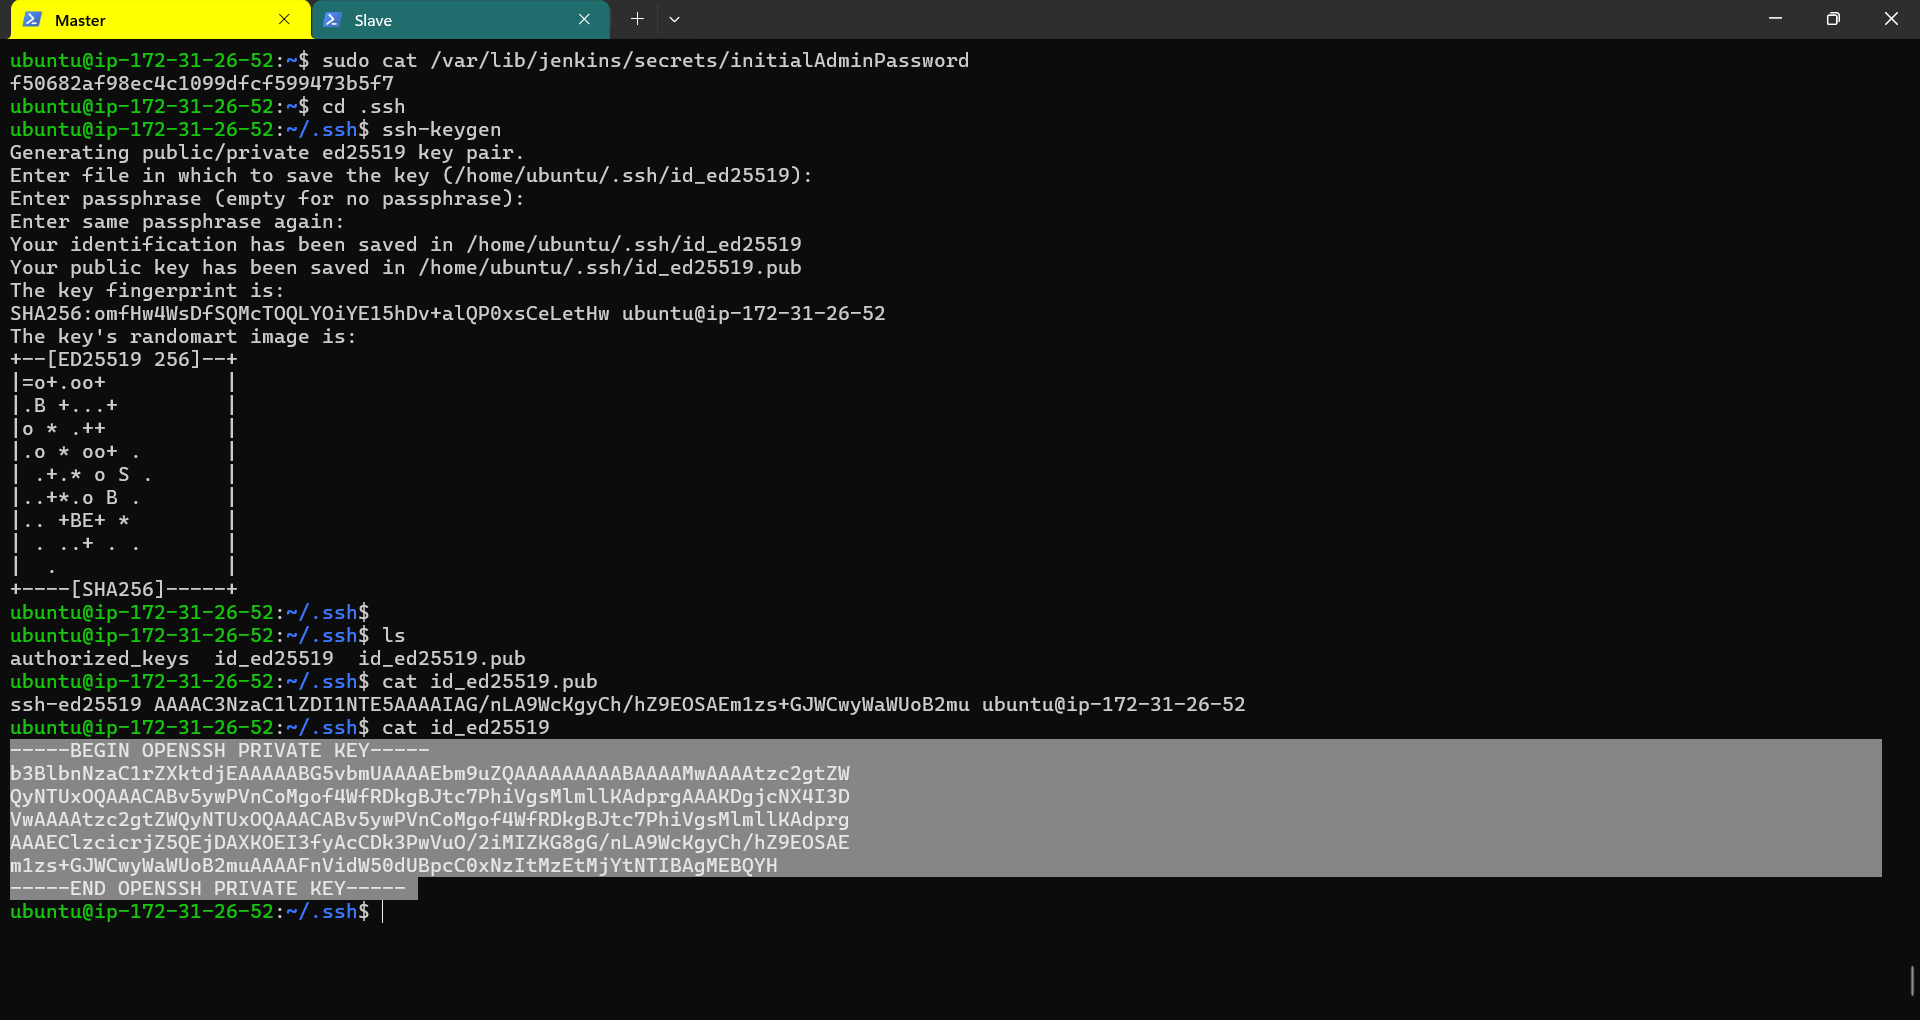
Now the next is ssh-ing between Master and Slave node. If Master node wants to connect to Slave node, Master should have private key, whereas its public key should be shared with Slave. So, generate Key-pair by using ssh-keygen command as shown above and copy public key in authorized keys on Slave as shown below.
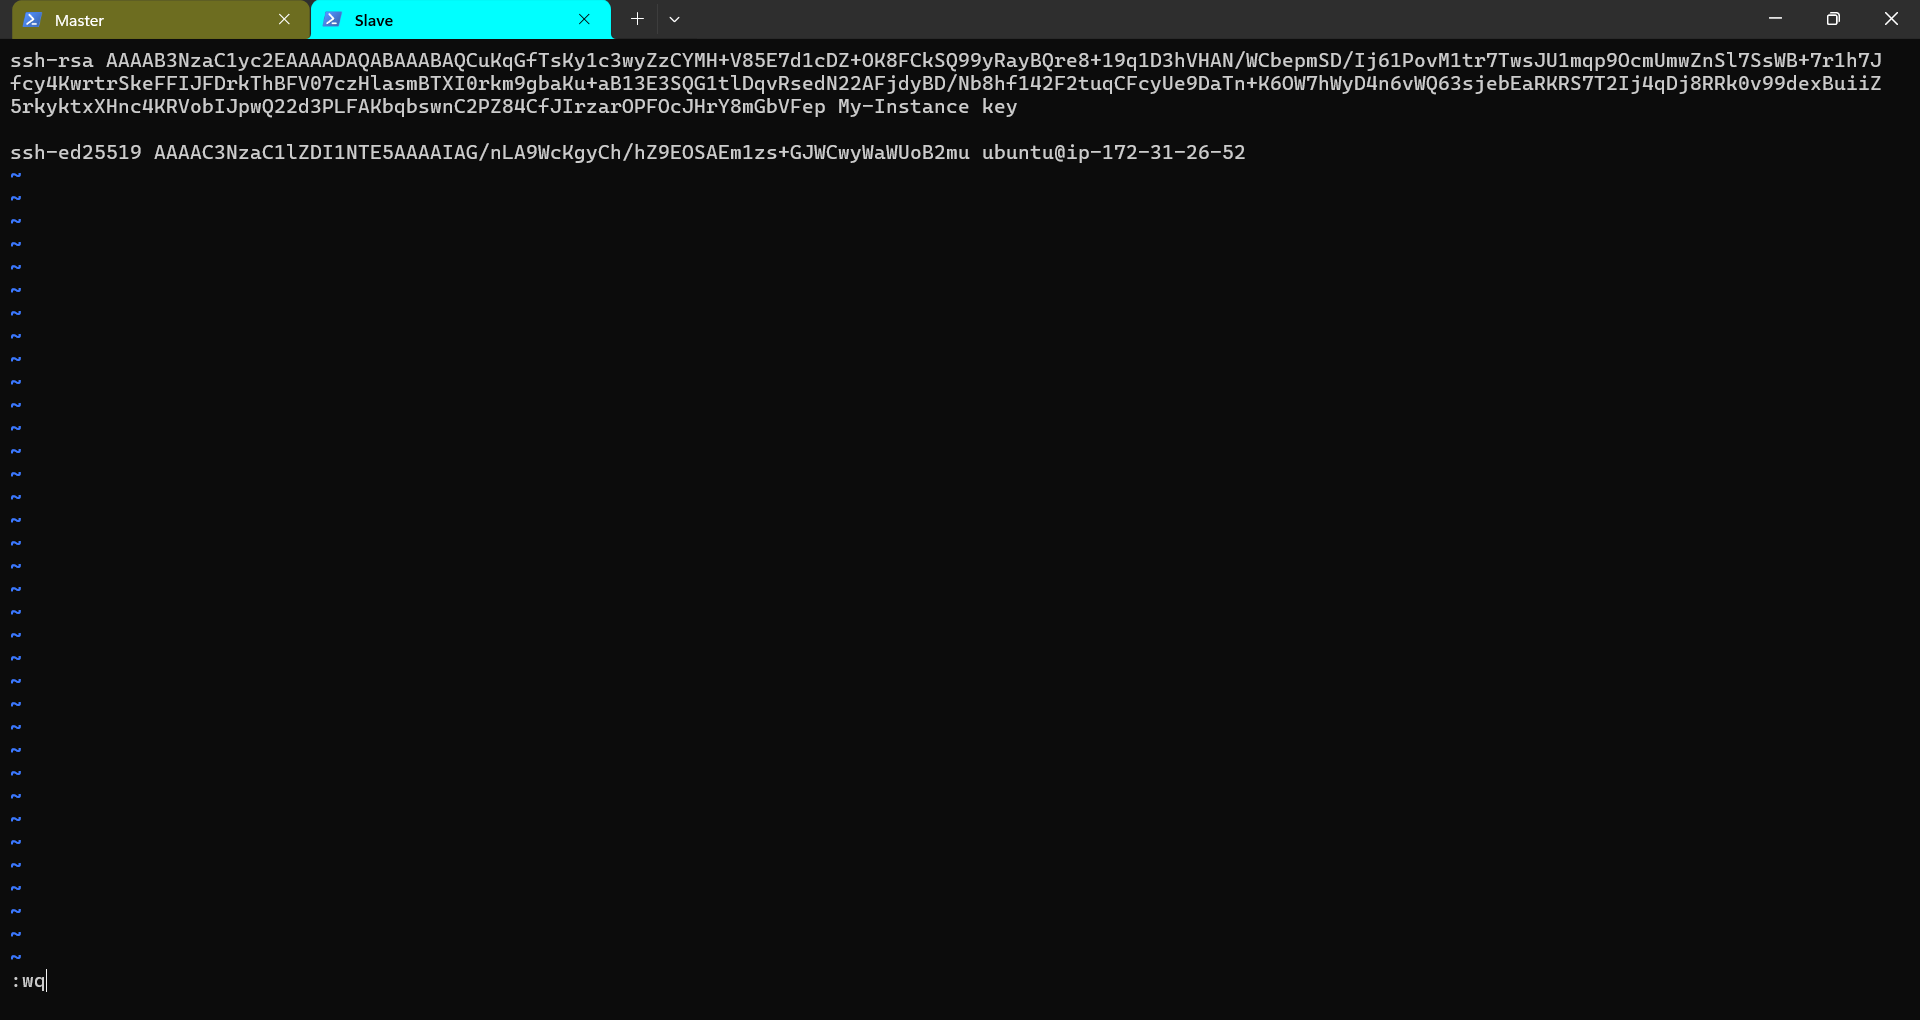
Now you will find both the servers are connected through ssh keypair. To check the same you can write the following in Master node
ssh -i /path/to/private-key.pem username@hostname_or_ip-of-slave-nodeStep-3: Setting up Declarative Pipeline in Jenkins
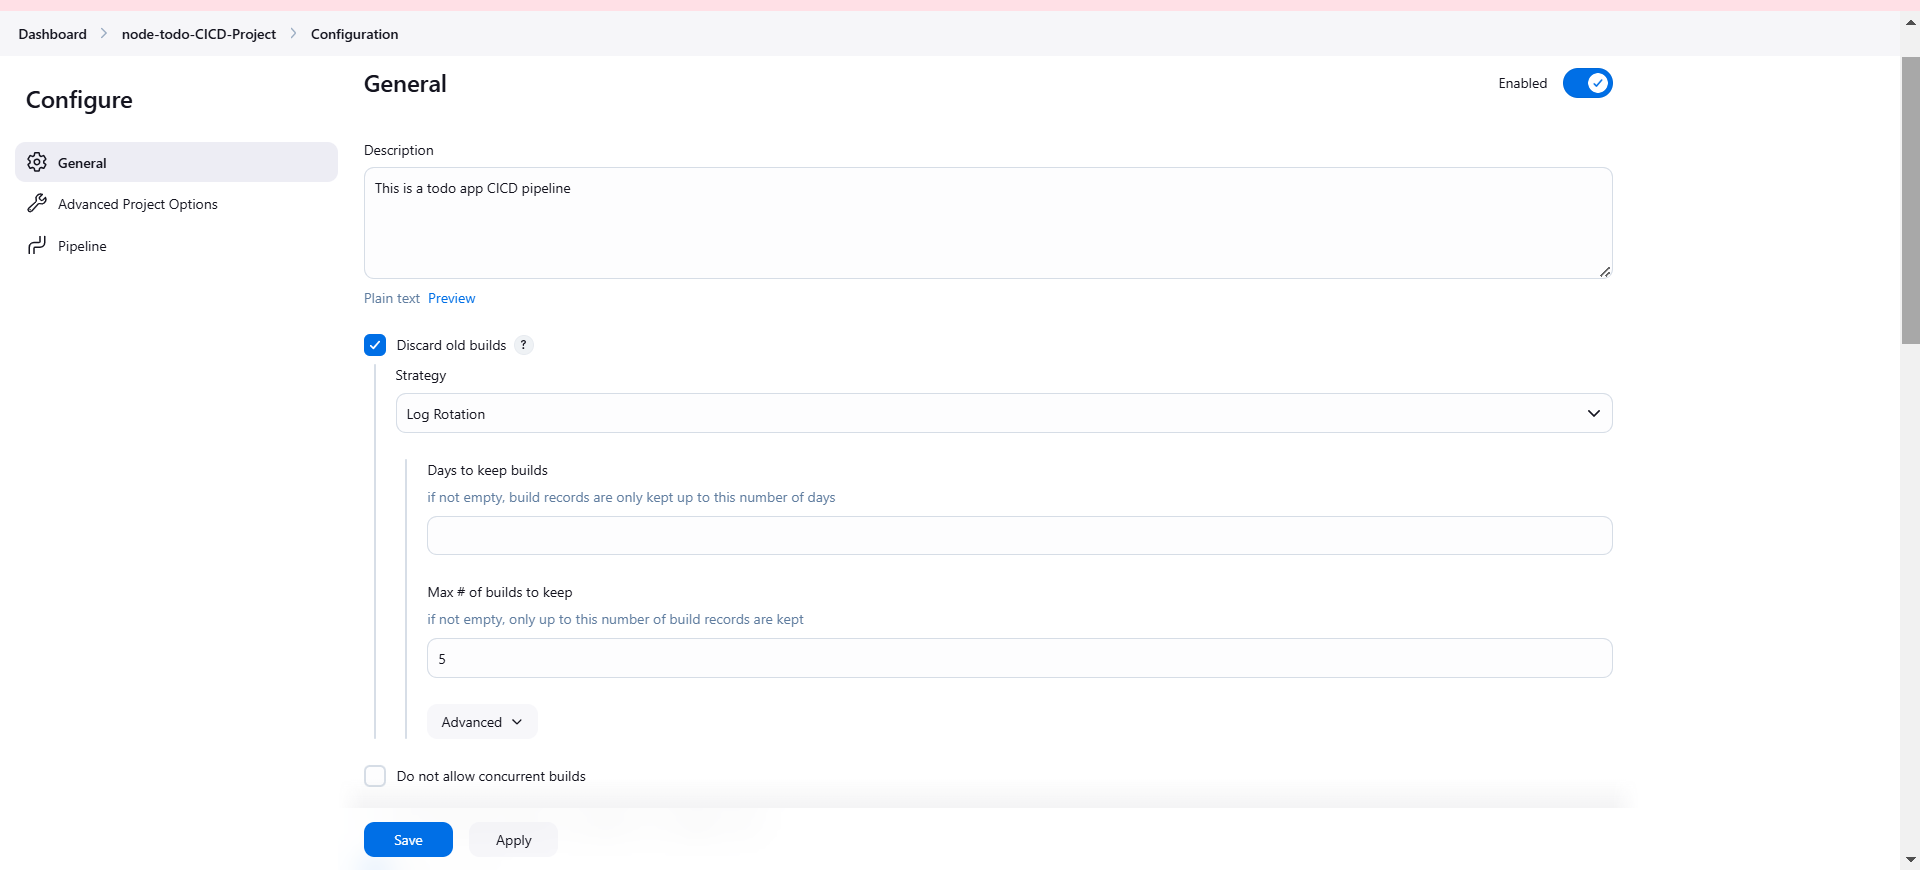
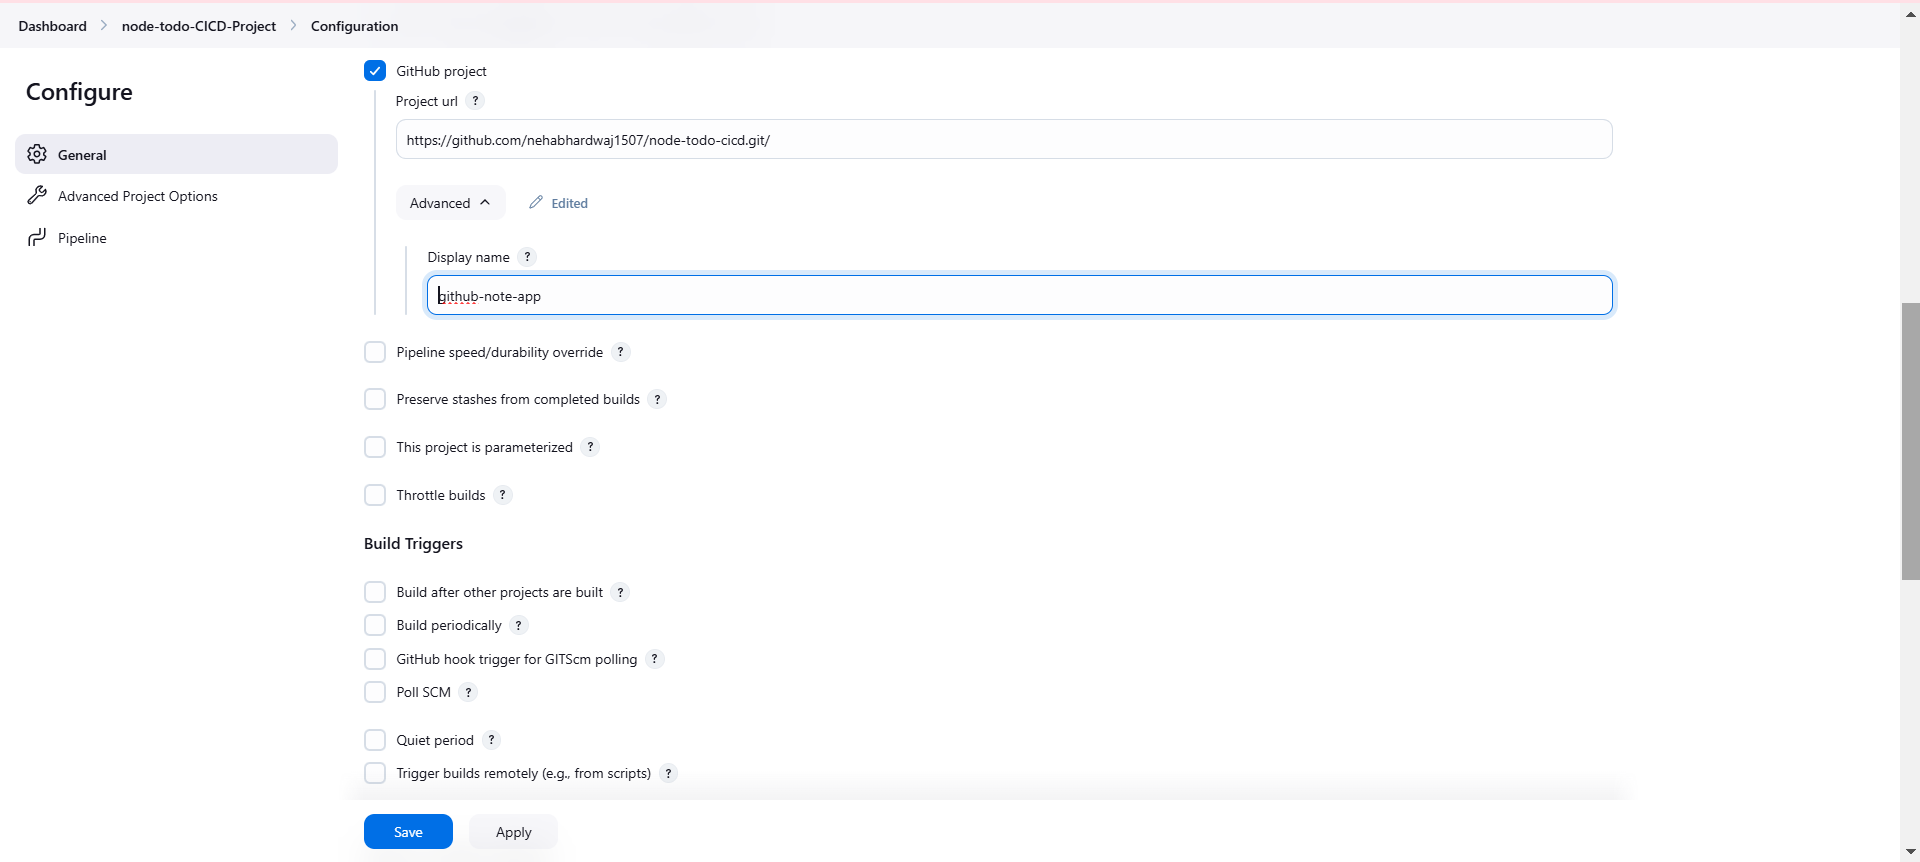
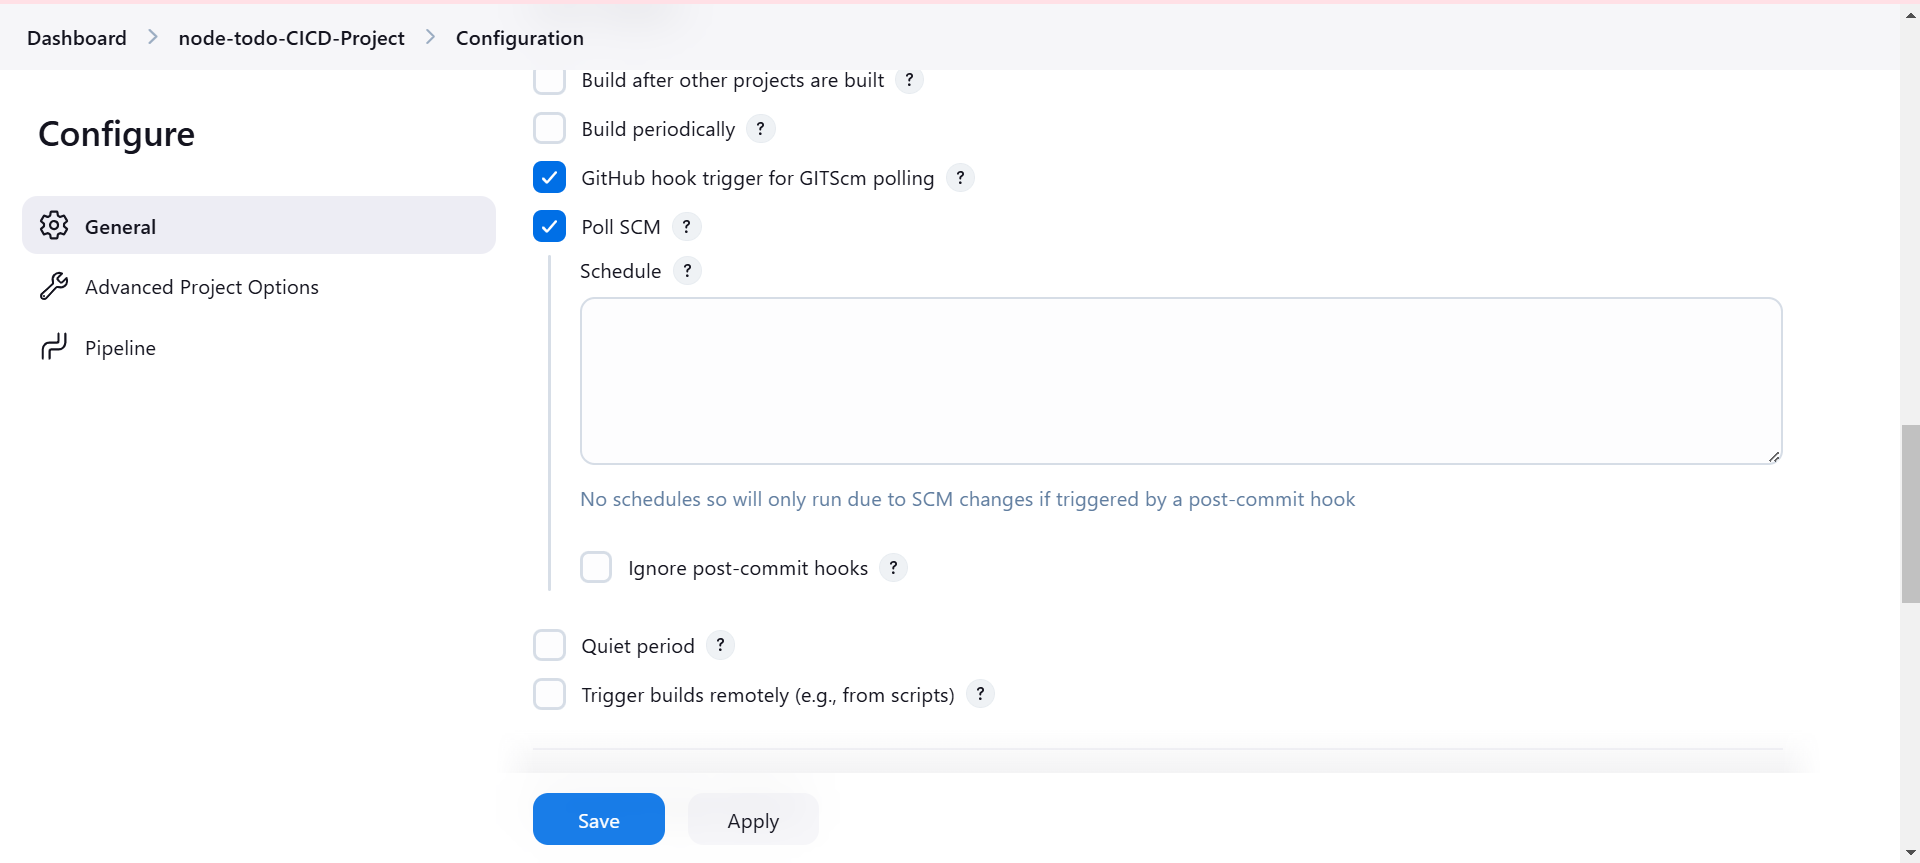

The above are the steps to create a pipeline. Here, the https link for git-hub repository containing the git-hub project is given. Also, we select the option for ‘GitHub hook trigger’ with ‘Poll SCM’ which will trigger if there is any change in the code. Moreover, to automate whole process, we selected ‘Pipeline script from SCM’ option which will trigger the Jenkins pipeline using Jenkins file from the given Git repository.
Step-4: Connect Master to Slave in Jenkins GUI using Agents/ Nodes
Go to Dashboard ——> Nodes ——> Create Node
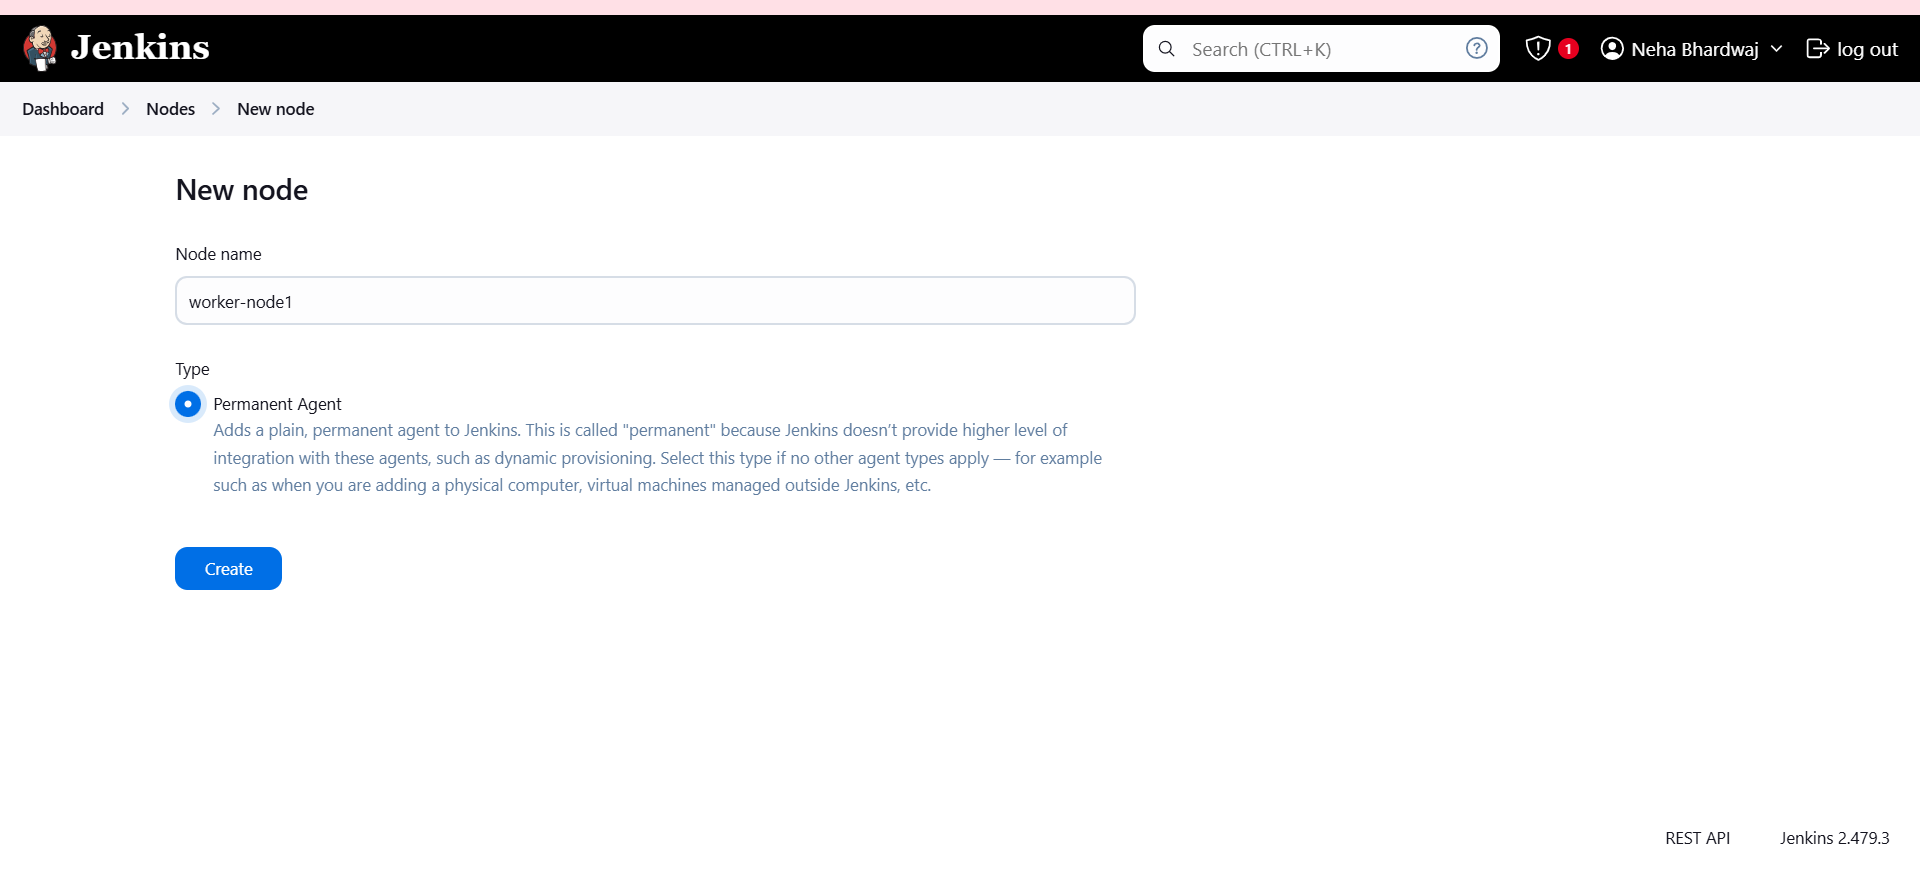
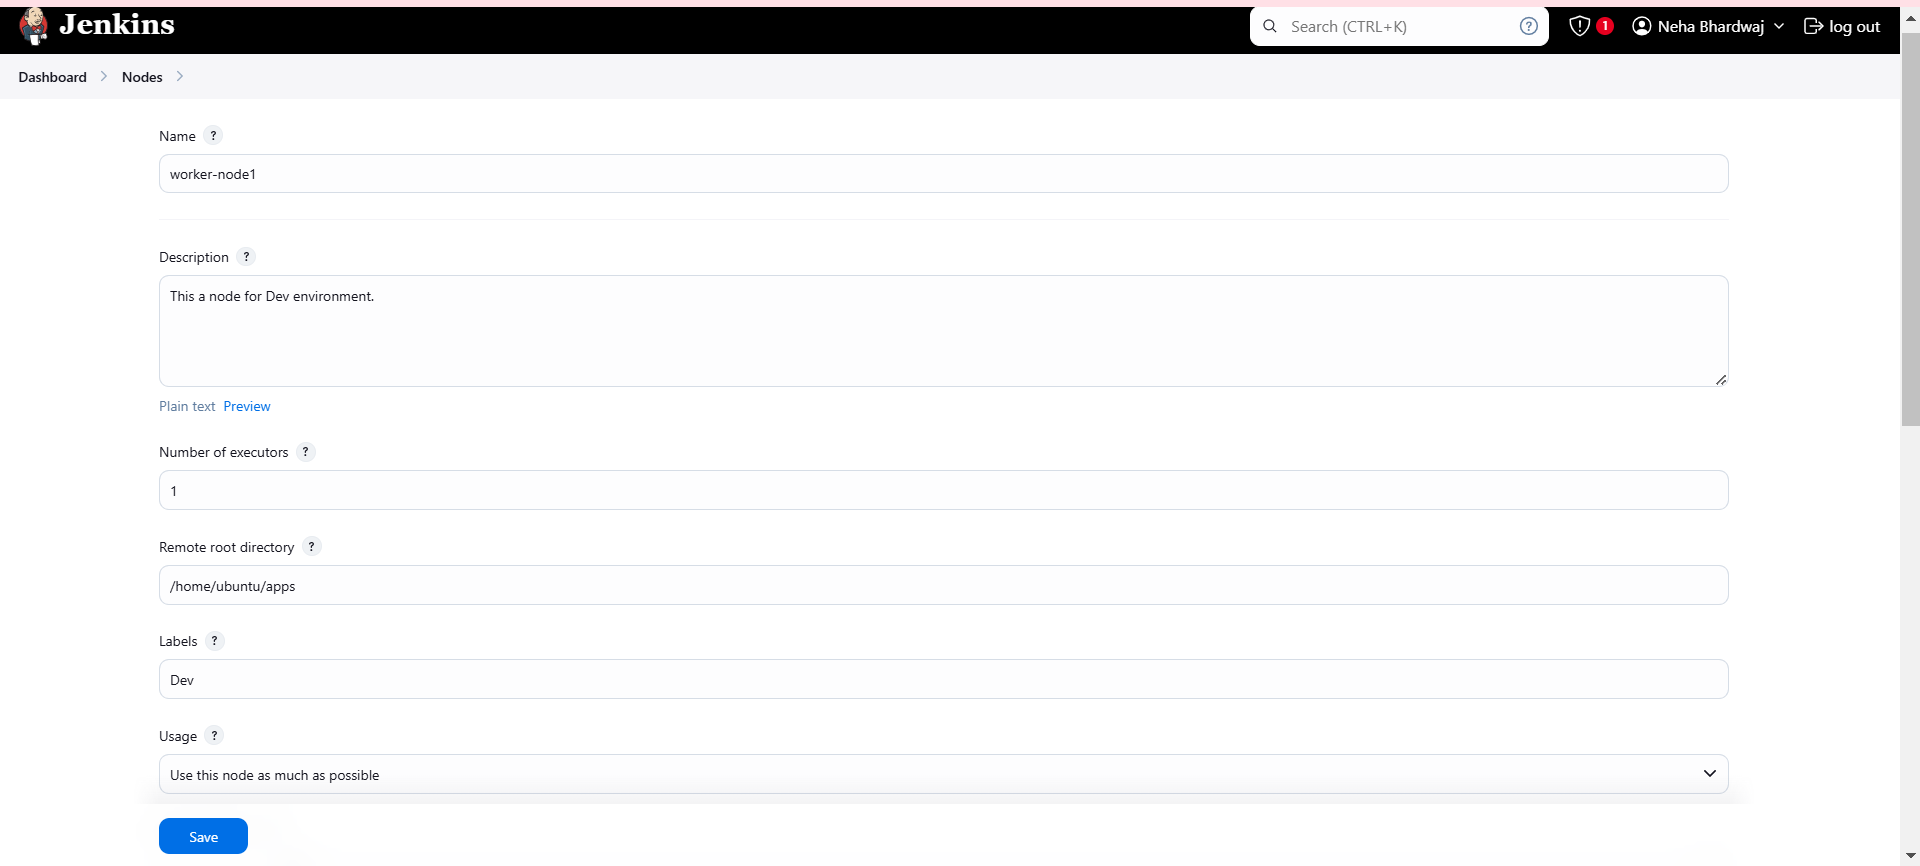
Here, we created a node representing Slave with the name ‘worker-node1’ and working directory will be apps which we defined in Slave CLI. Label this node in ‘Dev’ category which will help Master node while assigning work to the agent.
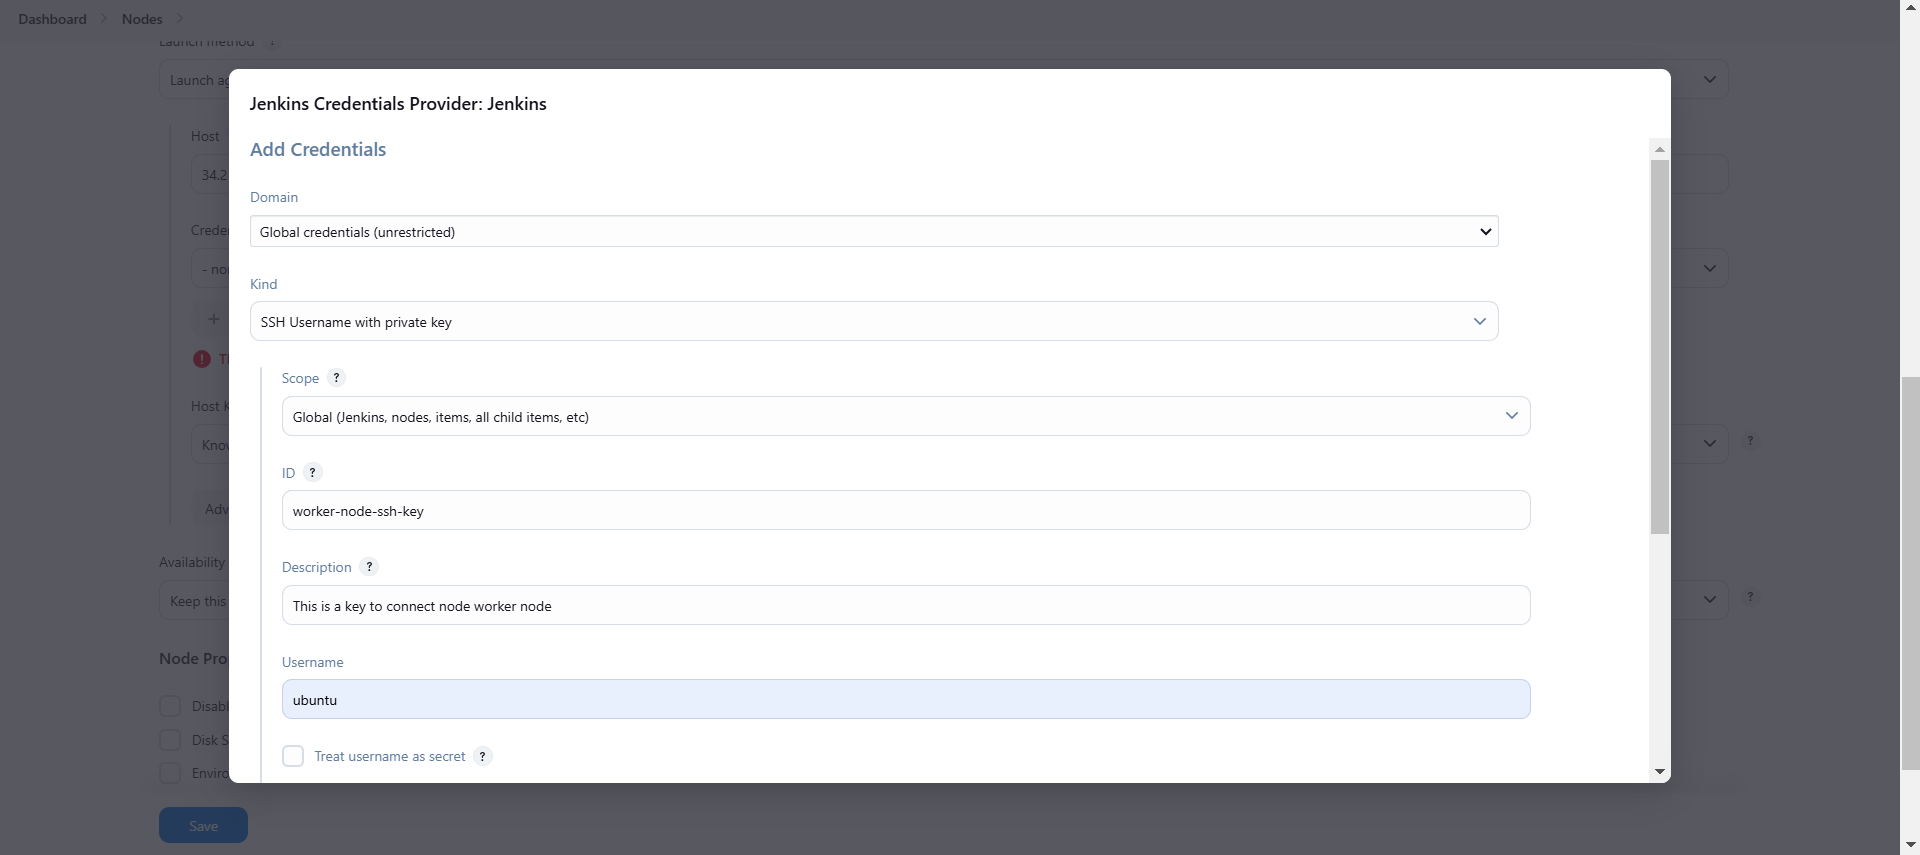
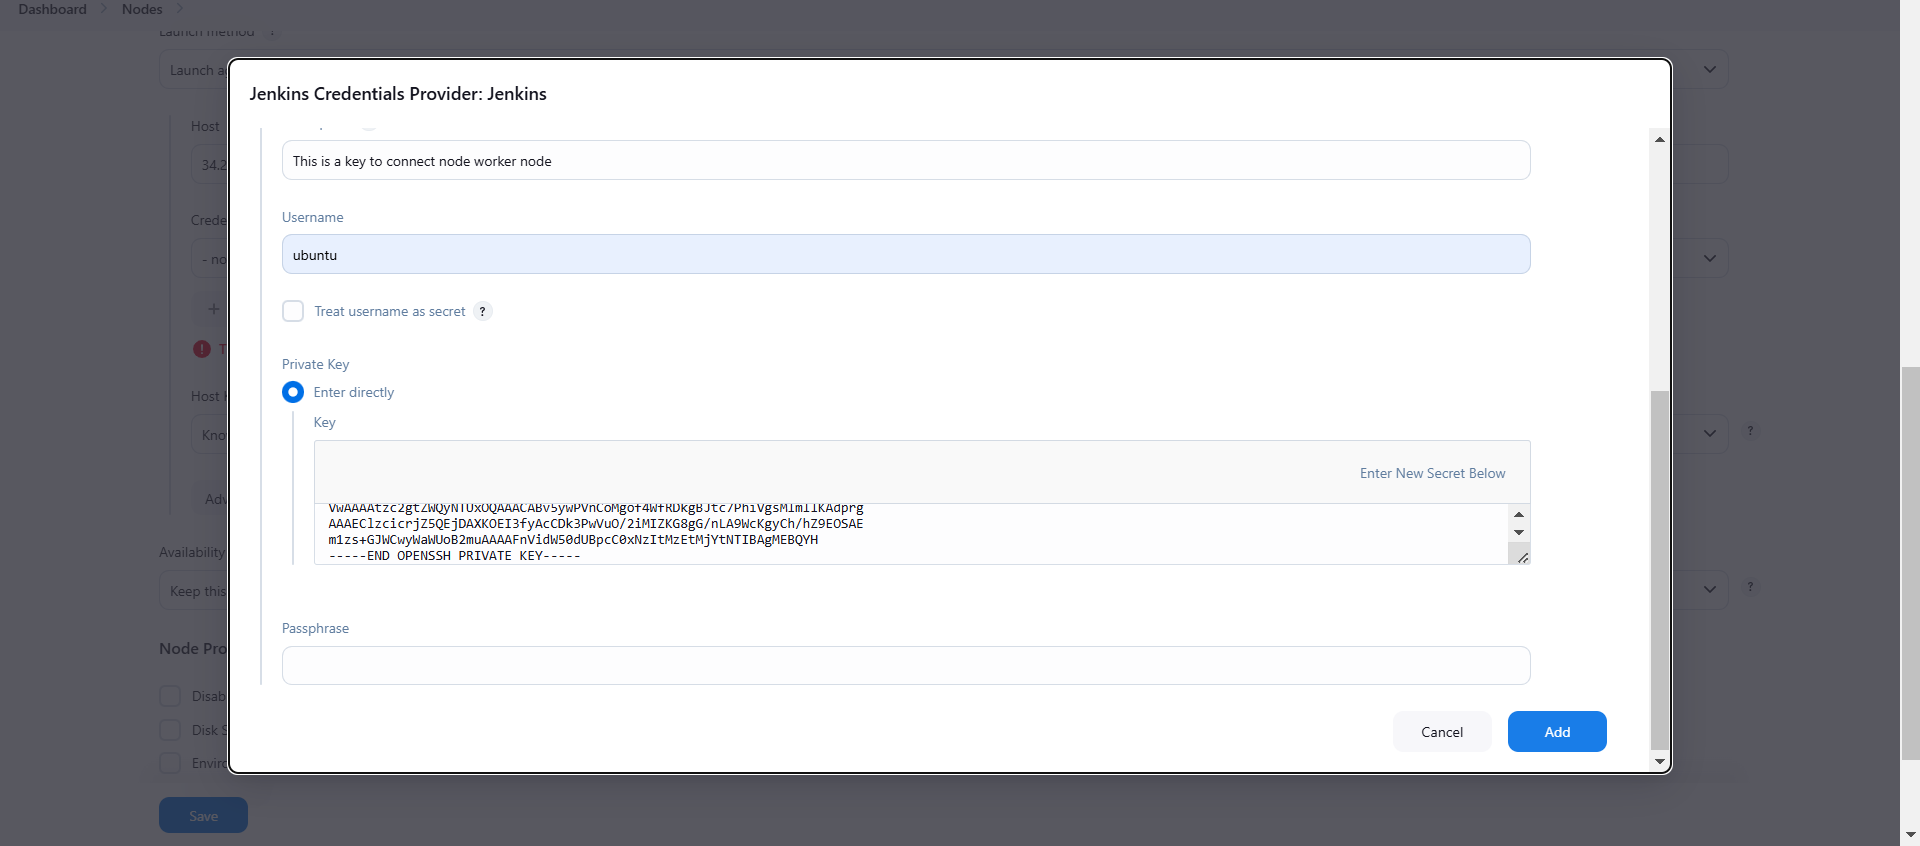
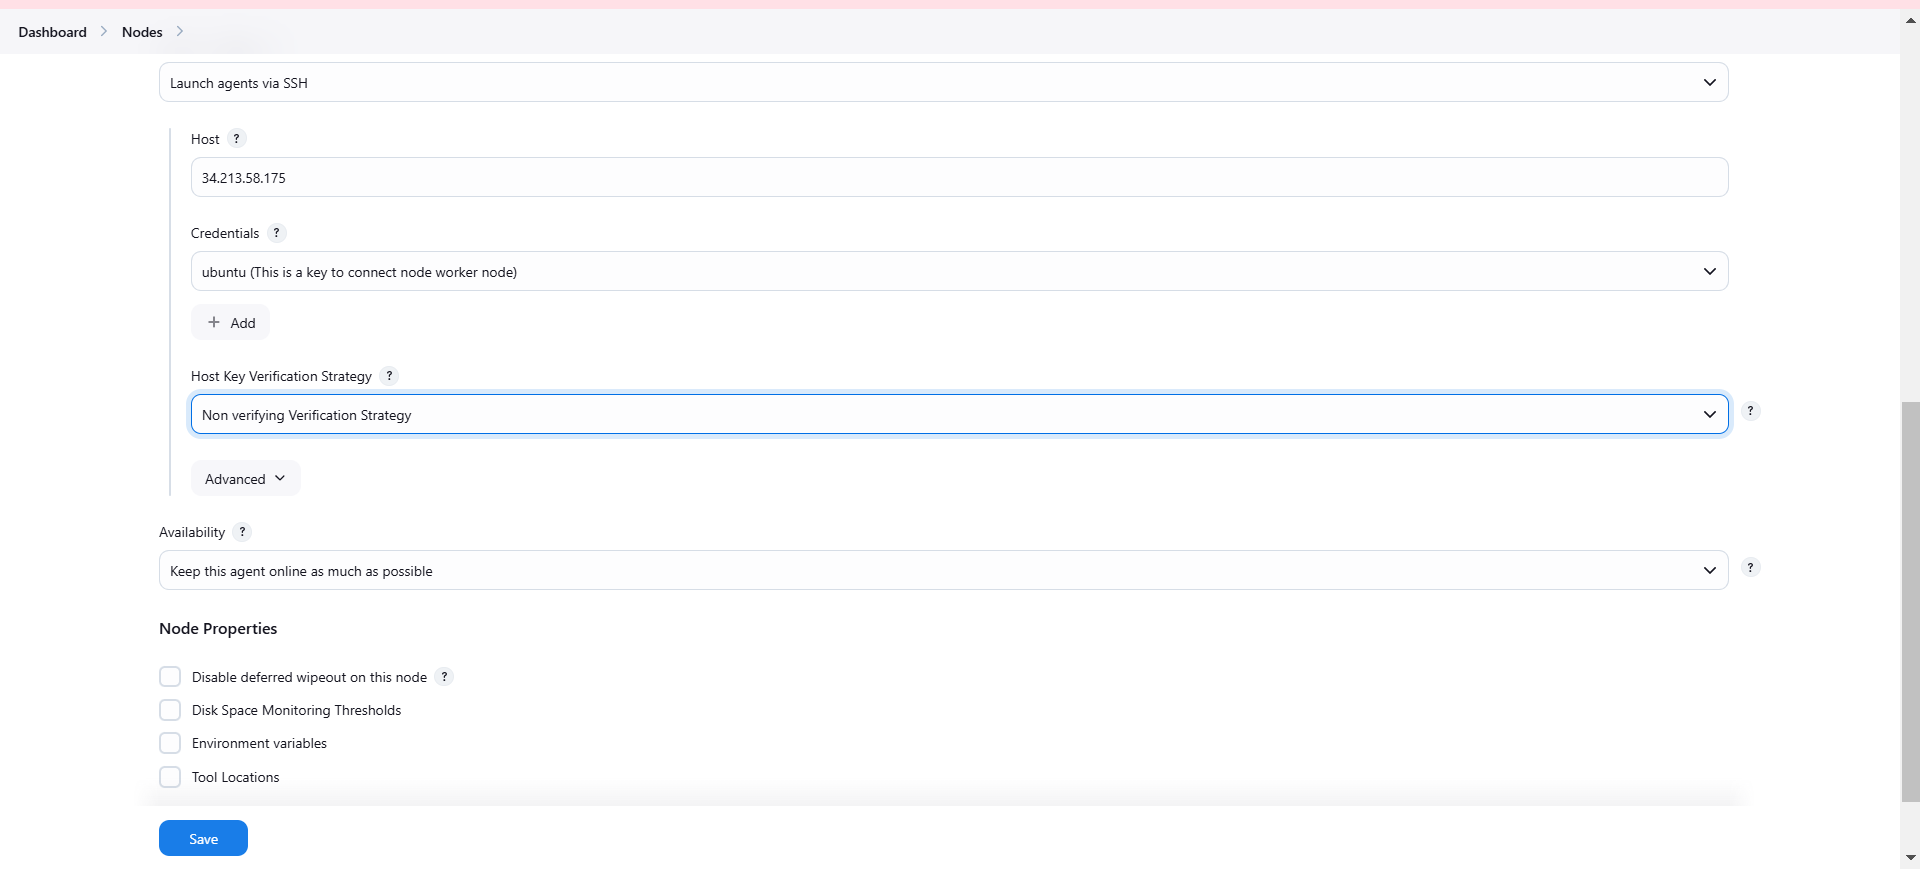
Now, setup credentials for Jenkins. Select SSH username with public key. Add username of your server, here its ubuntu. Now add private key of Master node in the field of private key. Also the Host will be the IP address of Slave Node. Select non-verifying strategy because we don’t want further verification and add agent.
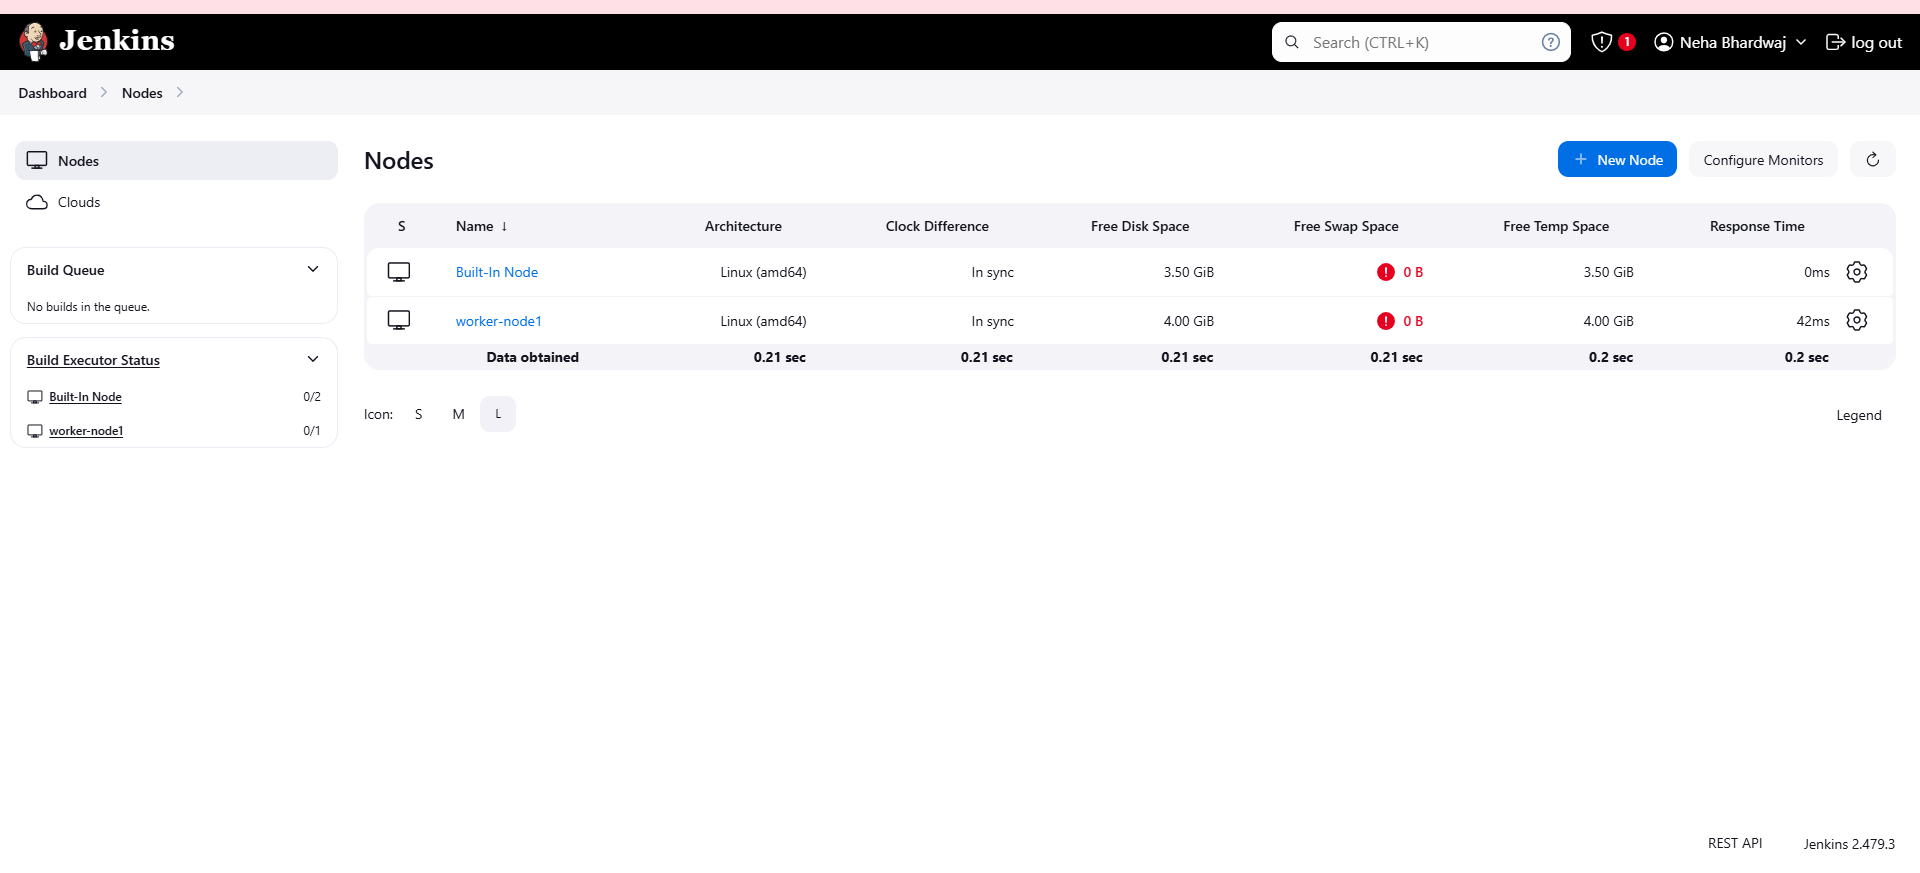
In the below image, you can see the agent is set up and ready to take jobs. You will find in Jenkins file, agents are assigned with labels always. Here label is ‘Dev‘.
Step-5: Deploying CICD of todo app
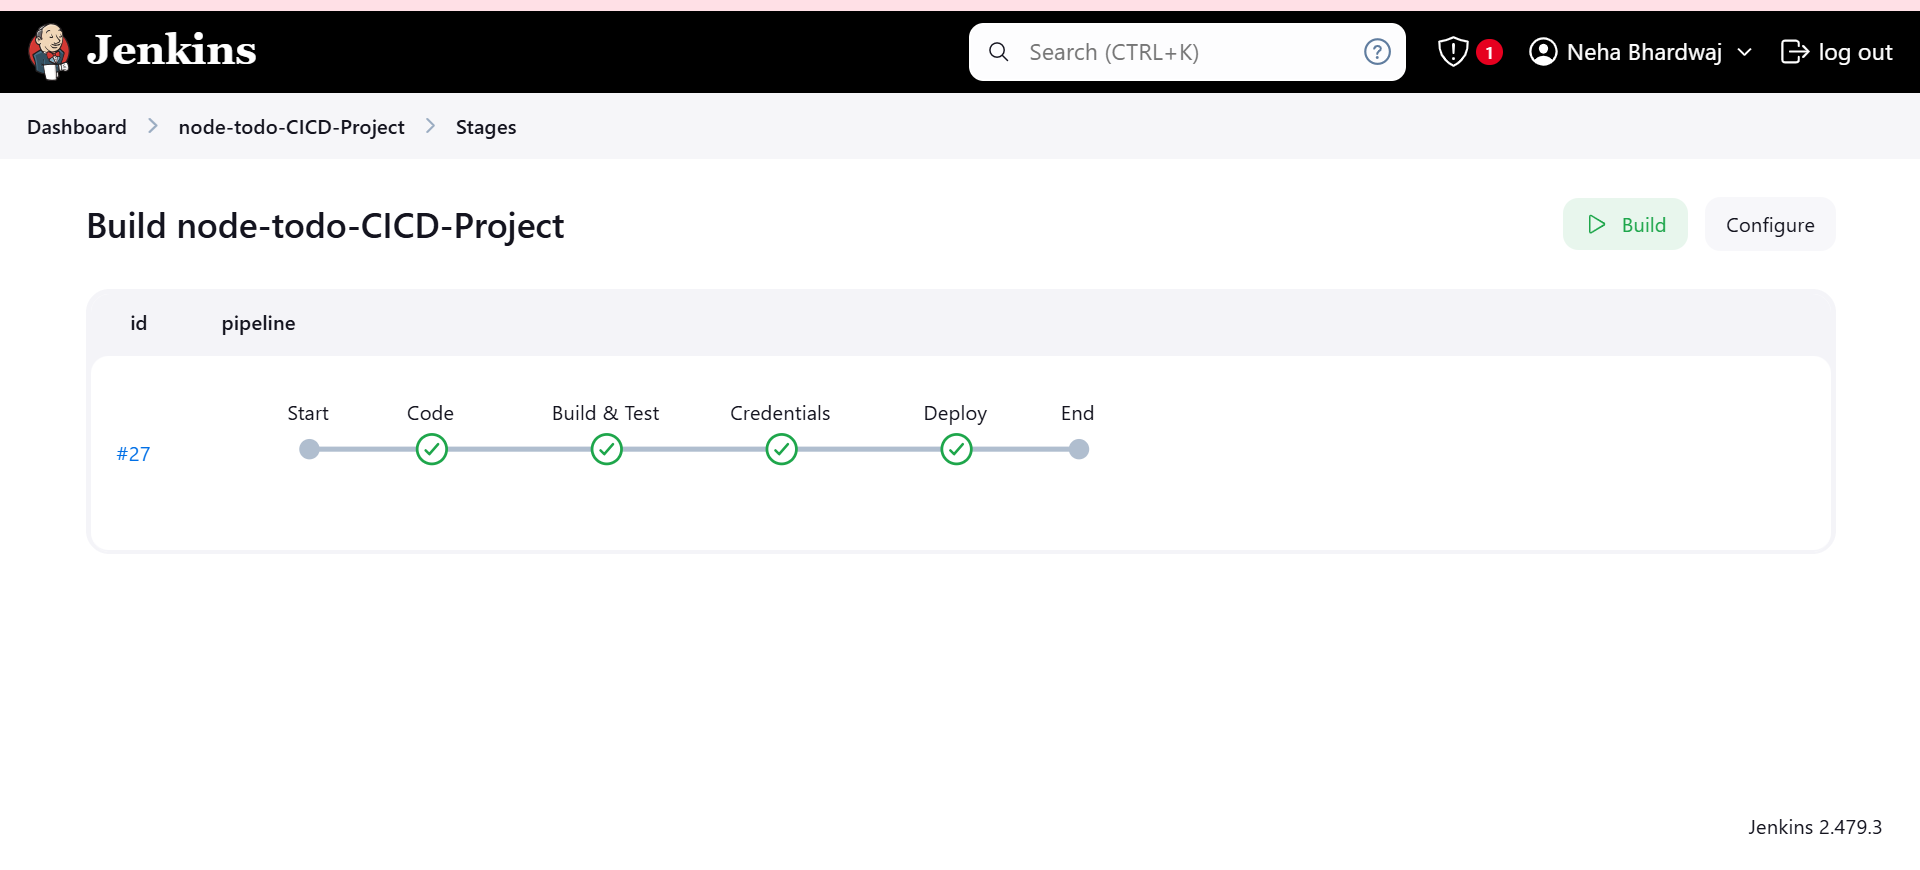
Here is the final view of pipeline running all the stages define in Jenkins.
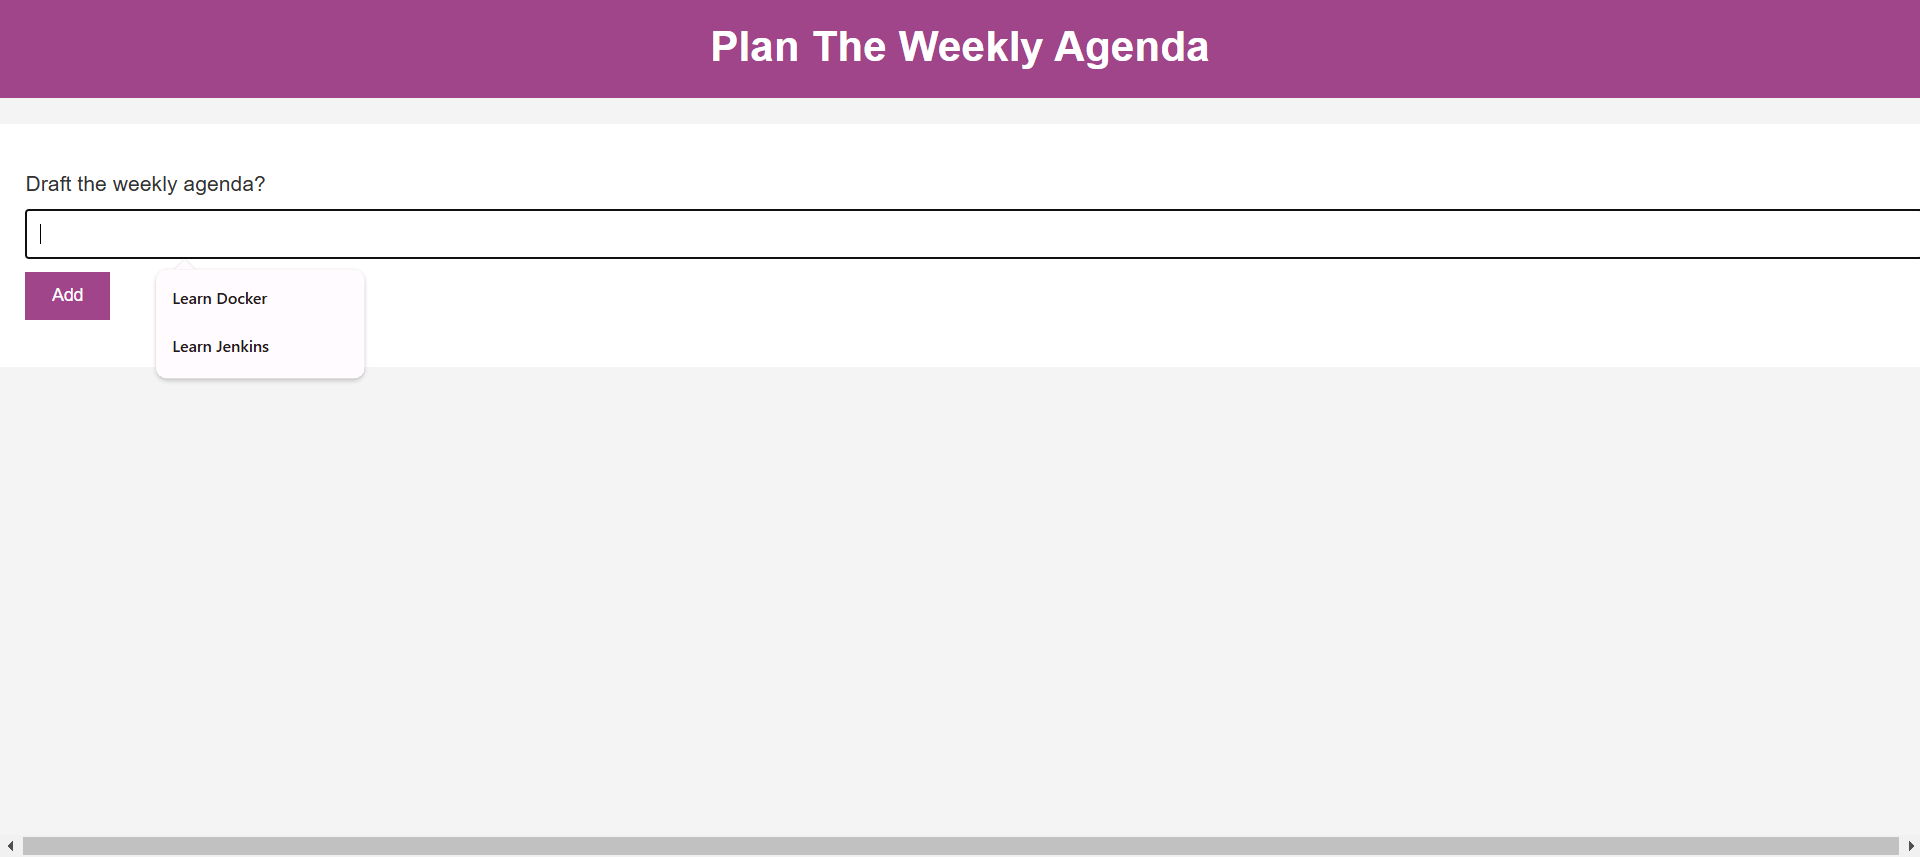
To check the application running on Slave Node or not, open the webpage with <Slave-PublicIP>:8000. If your pipeline is running fine, you will see the below output of todo app.
Make sure all the ports used in the applications should be open in the in-bound rules of respective ec2-server.
Setting-Up Webhooks to trigger GitHub commits
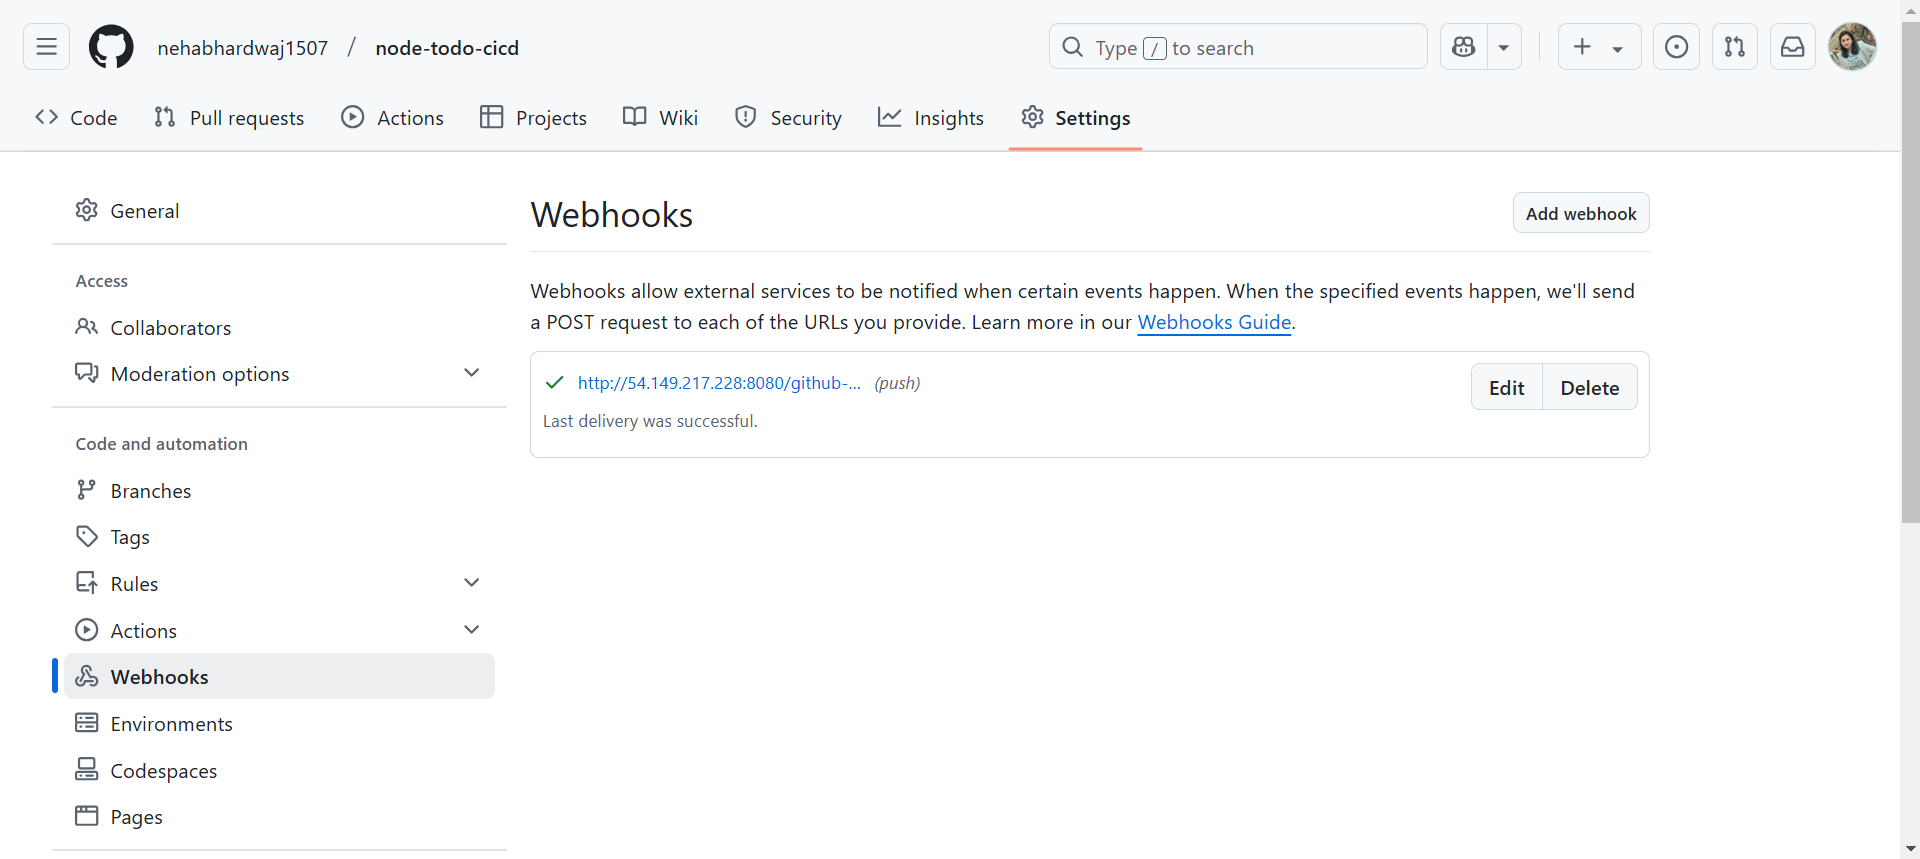
Go to settings of your repository in GitHub and add Webhooks.
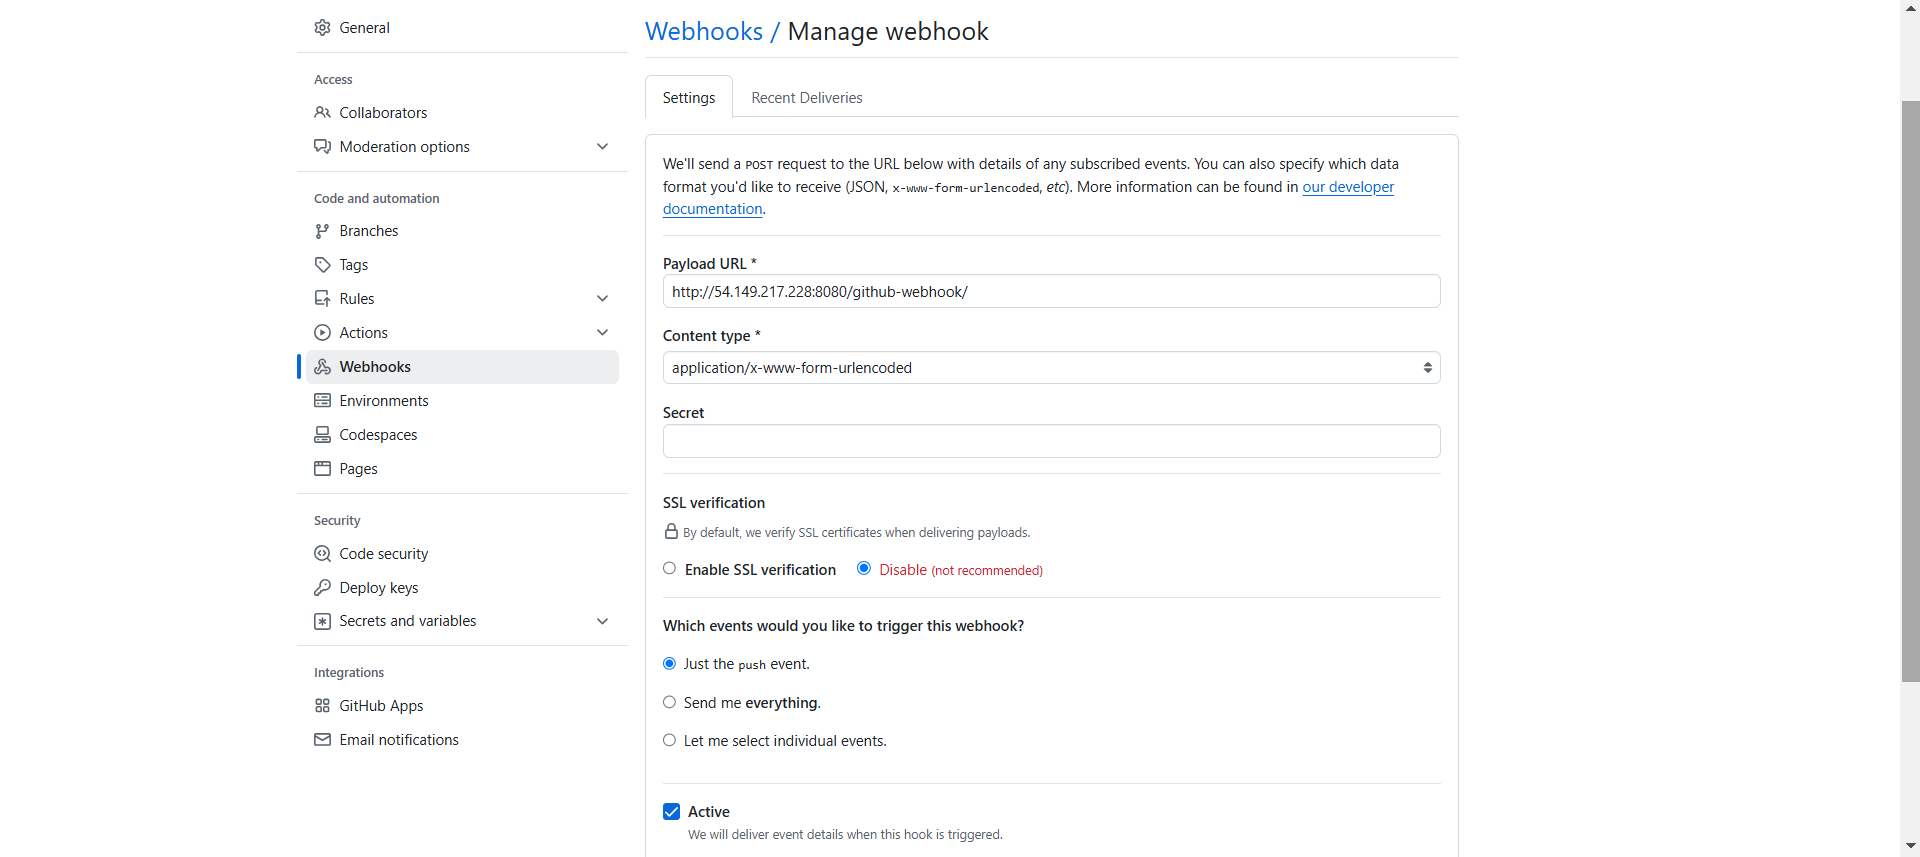
Payload: http://jenkins-master-public-ip:8080/github-webhook/
Event: select the event when you want to trigger webhook from Git to Jenkins
Hence, the Webhook is created.
Understanding Jenkinsfile
 pipeline {
     agent {
         node {
             label "Dev"
         }
     }
     stages {
        stage("Code") {
            steps {
             git url: "https://github.com/nehabhardwaj1507/node-todo-cicd.git", branch: "master"
            echo "Code is clonned"
            }
        }
        stage("Build & Test") {
            steps {

             sh "docker build -t todo:latest ."
            echo "Code is built and tested"
            }
        }
        stage("Credentials") {
            steps {
                 echo "Credentials for username and Password added"
                 withCredentials(
                     [usernamePassword(
                         credentialsId: "dockerhubcreds",
                         passwordVariable: "dockerHubPass",
                         usernameVariable: "dockerHubUser"
                         )
                     ]
                 )
                 {
                 sh "docker image tag todo:latest ${env.dockerHubUser}/todo-jenkins:latest"
                 sh "docker login -u ${env.dockerHubUser} -p ${env.dockerHubPass}"
                 sh "docker push ${env.dockerHubUser}/todo-jenkins:latest"
                 }
            }
        }
        stage("Deploy") {
            steps {
                  //sh "docker run -d -p 8000:8000 --name todo-app todo:latest"
                 sh "docker-compose down && docker-compose up -d"
                 echo "Application is deployed"
            }
        }
     }
 }
This Jenkins pipeline script defines a series of stages to automate the process of building, testing, and deploying a Dockerized application, specifically a Node.js TODO app, from a Git repository to Docker Hub and a deployment environment. Here's a breakdown of the pipeline:
Pipeline Breakdown:
Agent Declaration:
- The pipeline will run on a node with the label “Dev“. This means Jenkins will use an agent (e.g., a Jenkins worker) that is labeled "Dev" to run the pipeline.
Stages: The pipeline consists of several stages. Each stage contains steps that define the actions to be taken in that phase.
Stage 1: Code
Clone the Git repository containing the code.
git url: "https://github.com/nehabhardwaj1507/node-todo-cicd.git", branch: "master"Stage 2: Build & Test
Build the Docker image for the application.
sh "docker build -t todo:latest ."Stage 3: Credentials
Add credentials for Docker Hub login and push the Docker image to Docker Hub.
‘withCredentials([….])’: This block retrieves the Docker Hub credentials (stored in Jenkins' credentials store) using ‘usernamePassword’. The credentials are passed into the environment variables ‘dockerHubUser’ and ‘dockerHubPass’.
        stage("Credentials") {
            steps {
                 echo "Credentials for username and Password added"
                 withCredentials(
                     [usernamePassword(
                         credentialsId: "dockerhubcreds",
                         passwordVariable: "dockerHubPass",
                         usernameVariable: "dockerHubUser"
                         )
                     ]
                 )
Below step will tags the ‘todo:latest‘ image with a new name, using the ‘dockerHubUser’ as the prefix (e.g., username/todo-jenkins:latest.
sh "docker image tag todo:latest ${env.dockerHubUser}/todo-jenkins:latest"Below command will logs in to Docker Hub using the credentials from the environment variables.
sh "docker login -u ${env.dockerHubUser} -p ${env.dockerHubPass}"Below command will pushes the newly tagged image to Docker Hub.
sh "docker push ${env.dockerHubUser}/todo-jenkins:latest"Stage 4: Deploy
Deploy the application. It will stops and removes any running containers and services using Docker Compose, then starts the services in detached mode (-d). This assumes there is a ‘docker-compose.yml’ file to define the deployment.
Pushing Image to Docker Hub
Steps to generate PAT in Docker Hub
Go to Docker Hub ——→ Account Settings ——→ PAT ——→ Generate new token for Read, Write and Delete ——→ Save token
Copy this token and add in Jenkins credentials as Docker Hub Password.
Steps to add Docker Hub credentials in Jenkins
Go to ——→ Manage Jenkins ——→ Security ——→ Credentials ——→ Stores scoped to Jenkins ——→ Clock on global domain ——→ go to Global Credentials ——→ Add credentials
To add credentials, we need Username, Password and ID.
Username will be the name of your Docker Hub account,
Password will be Personal Access Token generated in Docker Hub and
ID will be a name which will represent username + password.
Here, ID used is “dockerhubcreds“
This blog covers everything about Jenkins Fundamentals. I hope you find it helpful! Stay tuned for more insights on Jenkins. Don’t forget to follow for more useful blogs. – Neha Bhardwaj


