
Docker Project 1: Containerizing Django web-based application through Docker File
DevOps Blog: 5


In the last article, we learned about containerization in Docker. Moving further, in this blog we will see how to build an image with the help of "Docker File". Docker files are used to build an image and images are then containerized to run the application on different platforms.
Pre-requisites:
Docker installed on a server using AWS account.
Docker Hub account
To successfully run this project, the following steps should be followed:
Clone a git-hub repository of the Django application.
Understand the requirements of the projects and write a Docker File to support all the dependencies required.
Build an image from the Docker File created.
Create and run container through docker image.
Check the port mappings properly (docker container: ec2 instance)
Open the port using the Public IP of the AWS server and you will find your application running.
Now push the docker image to your docker hub repository.
Step 1: As shown in the screenshot below, the git repository containing Django app named react_django_demo_app is cloned to the local repository.
$ git clone <HTTPS link or path of GitHub repository>
Let's remove the Dockerfile already existing in the repo and try to write your own to run the application. To create Dockerfile, we must be aware of the requirements that can be found in 'reqirements' or 'readme' file. If there is no such file exist and you fail to determine the requirements then you need to request the same from developer.
vim Dockerfile

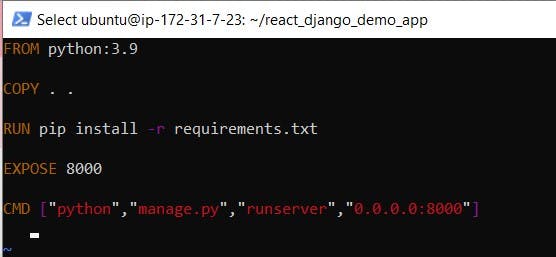
Step 2: Write the Dockerfile as per the given structure.
FROM <image:tag> Download the image required
COPY . . Code will be copied from the current directory to the current directory only.
RUN Installs all required software as per the requirements given in the requirements file.
EXPOSE Will expose the port number required.
CMD [arguments] Will run the whole script after the build stage.
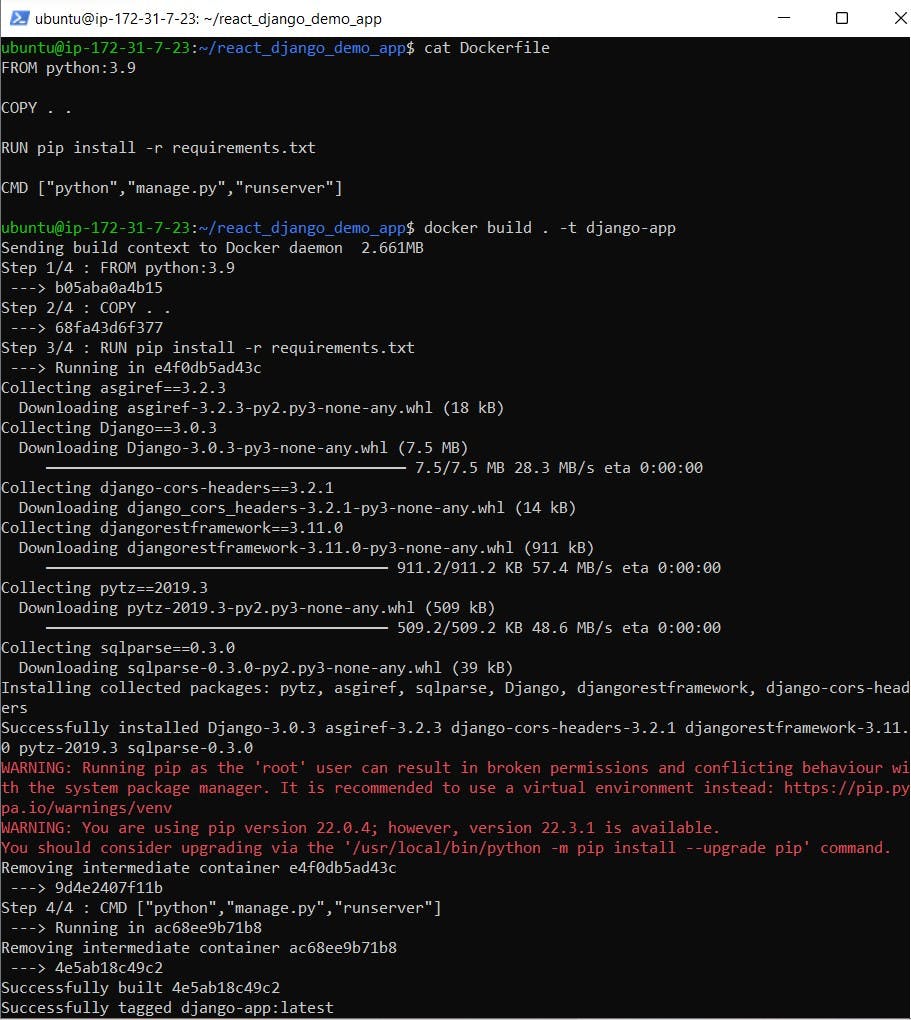
Step 3: Build the image through Dockerfile using the command build.
$ docker build . -t <image_tag>
Here '.' represents the current working directory and '-t' stands for image tag. This command will build an image with the given image tag as shown below.
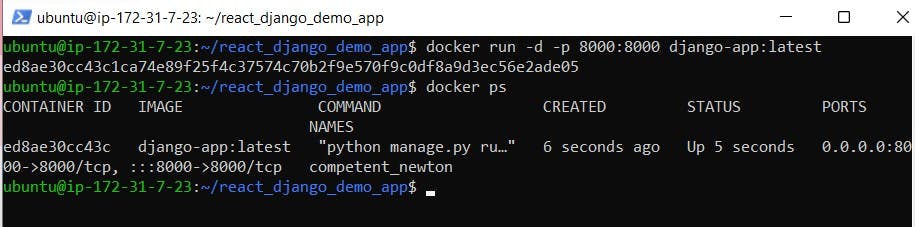
Step 4: Containerization of Docker image through run command.
$ docker run -d -p 8000:8000 <docker_image:tag>
Here '-d' represents the daemon mode and '-p' stands for the port number. This command will containerize the docker image at daemon mode which can be run using port number 8000 as shown below.
Step 5: Now, go to your ec2 instance and open port 8000 to establish a connection successfully if not already opened.

Step 6: By using 'Public IP of the Instance:8000', you will find your application running on the server.

Step 7: To push the docker image to the docker hub.
To do so, you first need to make your account and create a repository. Now login to your docker hub account through the ec2 instance (command line) and push the image you want to in your docker hub repository. Here I have created my docker hub account with the name 'dockerteam7' and repo with 'django-app'. Follow the commands to push your image to the docker hub.
$ docker login -u <dockerhub_username>
Password: <dockerhub_password>
$ docker tag local-image:tagname new-repo:tagname
$ docker push new-repo:tagname

Finally, the image will be pushed and can be seen on the docker hub repository for future use.

Hope this project will be helpful to you and add value to your resume. Thanks for reading the article. Please do like and follow if you find my blogs informative and interesting. Let's learn together, Grow together :) - Neha Bhardwaj